
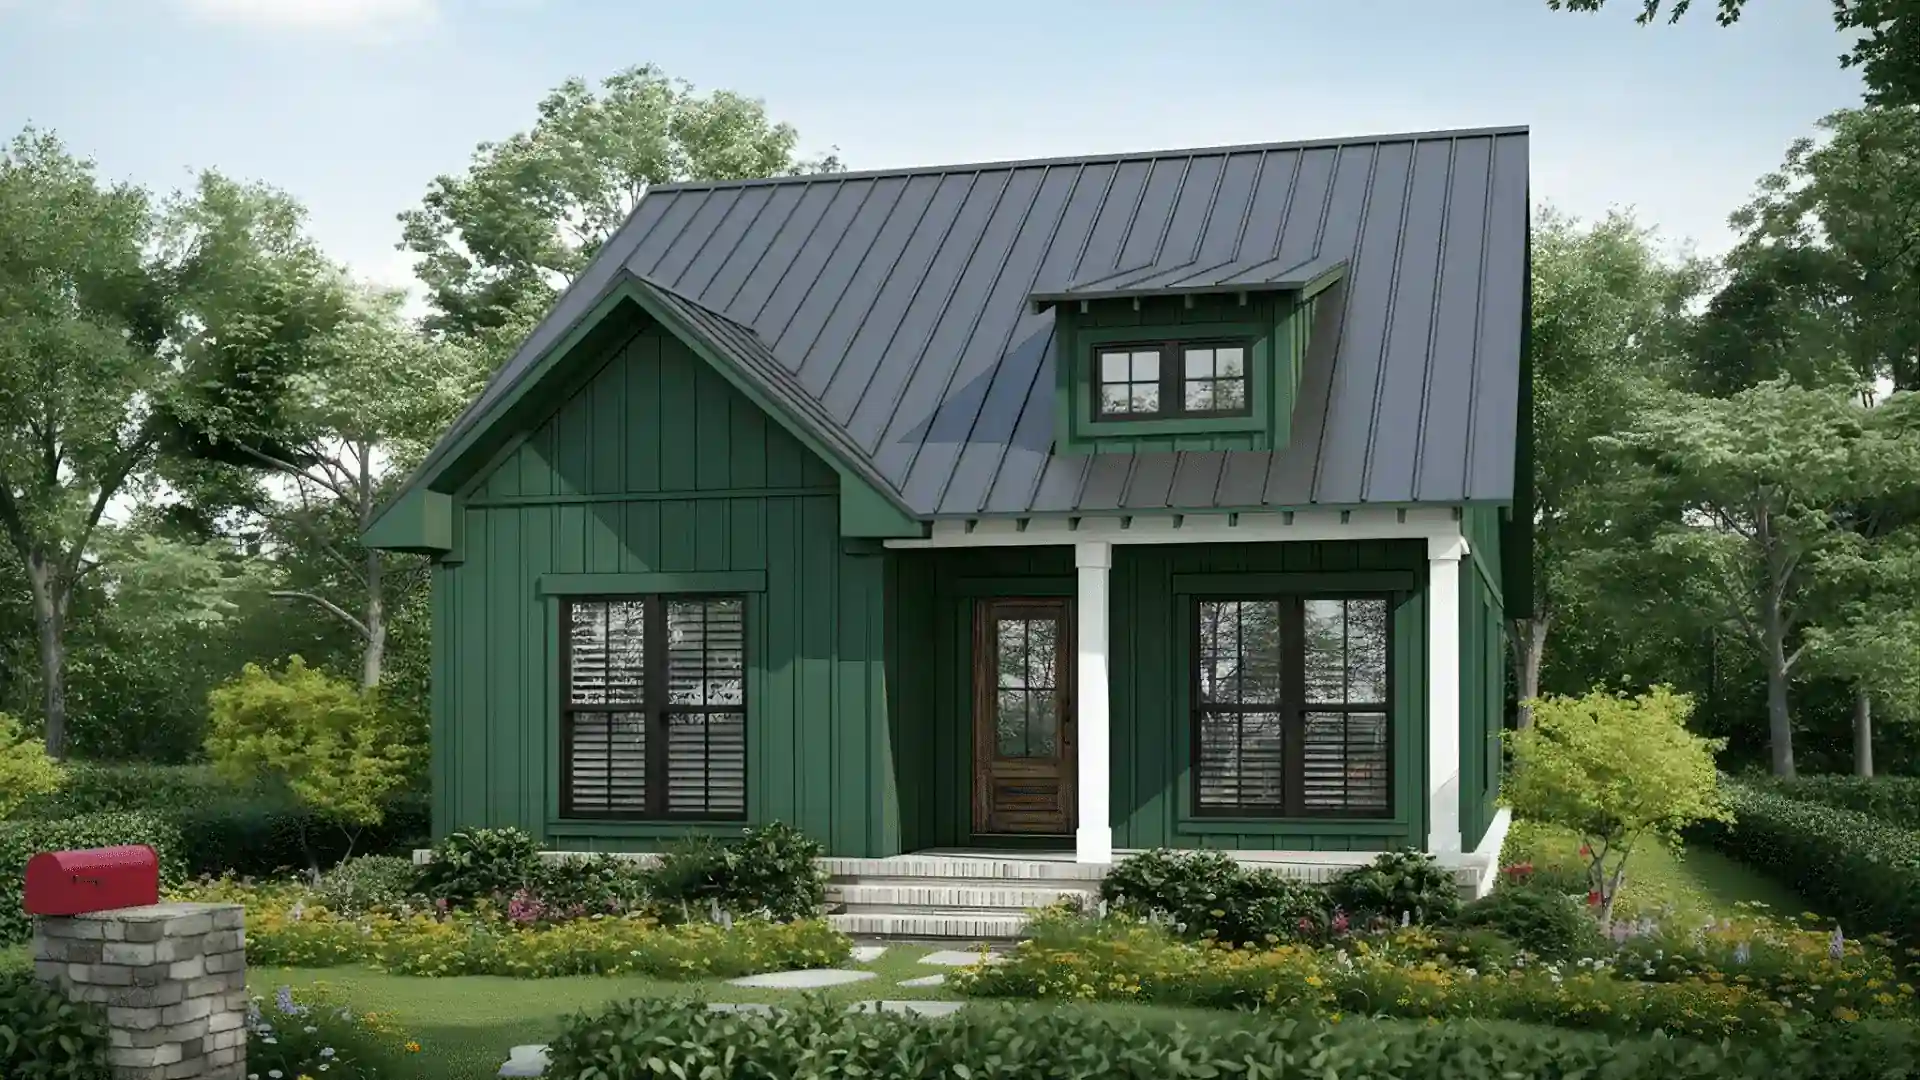
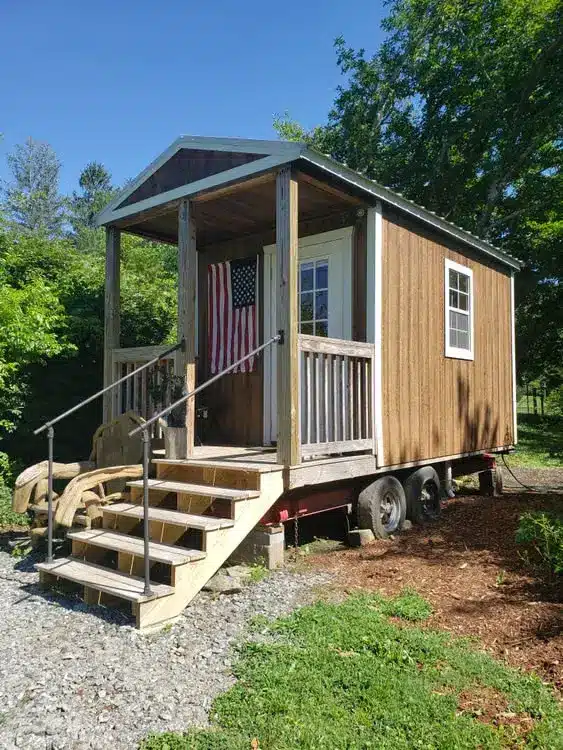
Building your own tiny home is more than just a project; it’s a chance to create a space that truly fits your life.
No matter if you’re dreaming of downsizing, saving money, or living with more freedom, this guide will walk you through it all in simple, practical steps.
You’ll learn how to plan smart, design efficiently, and build confidently, from the first sketch to the final coat of paint.
By reaching the end, you’ll have a clear roadmap to start building a tiny home that reflects your goals, budget, and lifestyle.
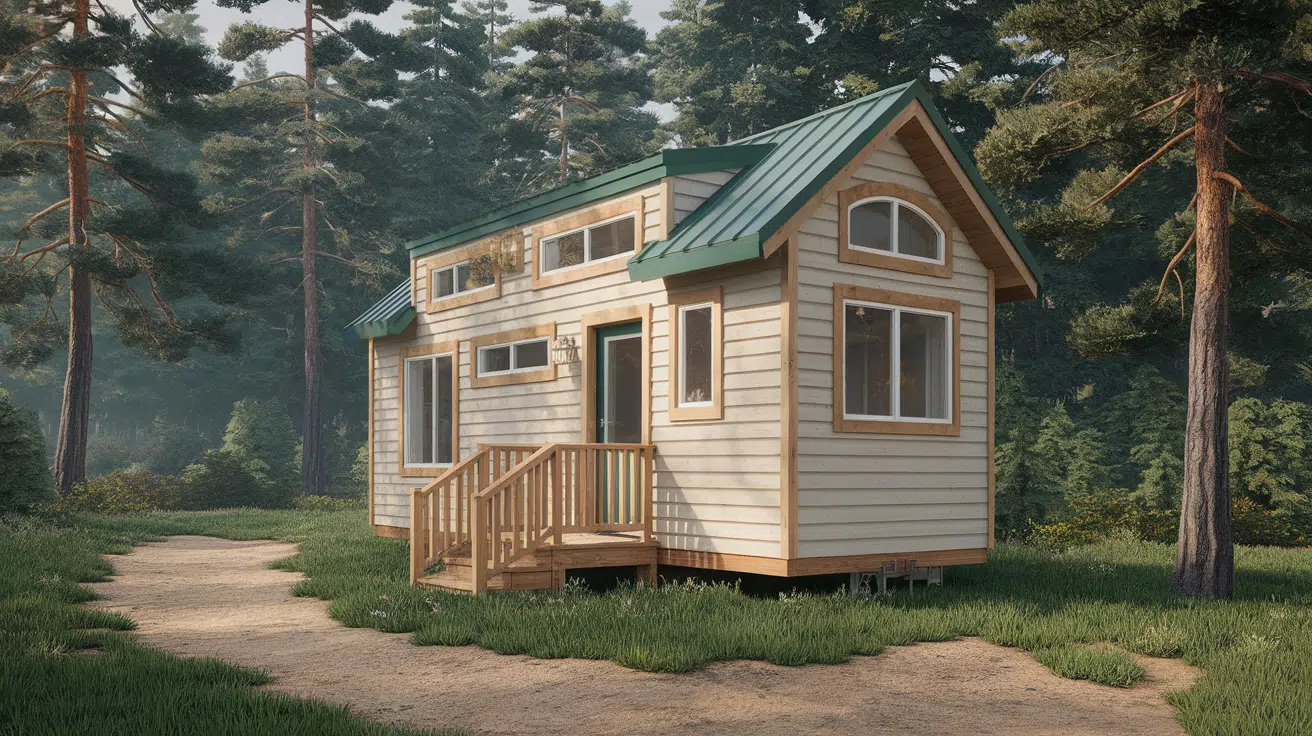
Planning and Designing Your Tiny Home
Before you pick up a hammer or buy materials, it’s important to plan what kind of tiny home you actually want. Good planning helps you save money, space, and time later.
1. Define Your Vision and Lifestyle
Start by thinking about why you want a tiny home. Is it to live more simply? Save money? Travel full-time? Knowing your “why” shapes every design choice. Also, think about your daily life:
- How many people (and pets) will live with you?
- Do you need space for remote work or hobbies?
- Will you live off-grid or near utilities?
Your answers help decide size, layout, and what comforts matter most.
2. Choose Between Stationary or Mobile
Next, figure out whether you want your tiny home on a trailer or on a foundation.
- Tiny Home on Wheels: Great for travel and flexibility. You’ll need a heavy-duty trailer and must follow road-width limits.
- Tiny Home on Foundation: Feels more permanent and stable. It’s easier to hook up utilities, but it may require more permits.
Keep in mind zoning laws, costs, and maintenance. If you plan to move often, mobility matters. If not, a fixed base might be better.
3. Determine Size, Layout, and Space Planning
Tiny homes come in all sizes, but the most common are:
- 20 feet: Compact and easy to tow; ideal for one person.
- 24 feet: A cozy size for a couple with smart storage.
- 28 feet or more: Roomier layouts for families or long-term living.
Think about how you’ll use each area. Add a loft for sleeping, a fold-down work table, or hidden storage under the stairs. Convertible furniture and multi-use spaces make a huge difference.
4. Select Durable and Sustainable Materials
Pick materials that are lightweight, long-lasting, and eco-friendly. For example:
- Framing: 2×4 lumber or steel for strength and weight balance.
- Siding: Engineered wood or metal for weather resistance.
- Insulation: Spray foam or wool for better energy efficiency.
- Roofing: Metal panels that last for decades with little upkeep.
Good planning and thoughtful design set the tone for a smooth build. Once your layout and materials are ready, you’ll have a clear roadmap for your tiny home journey.
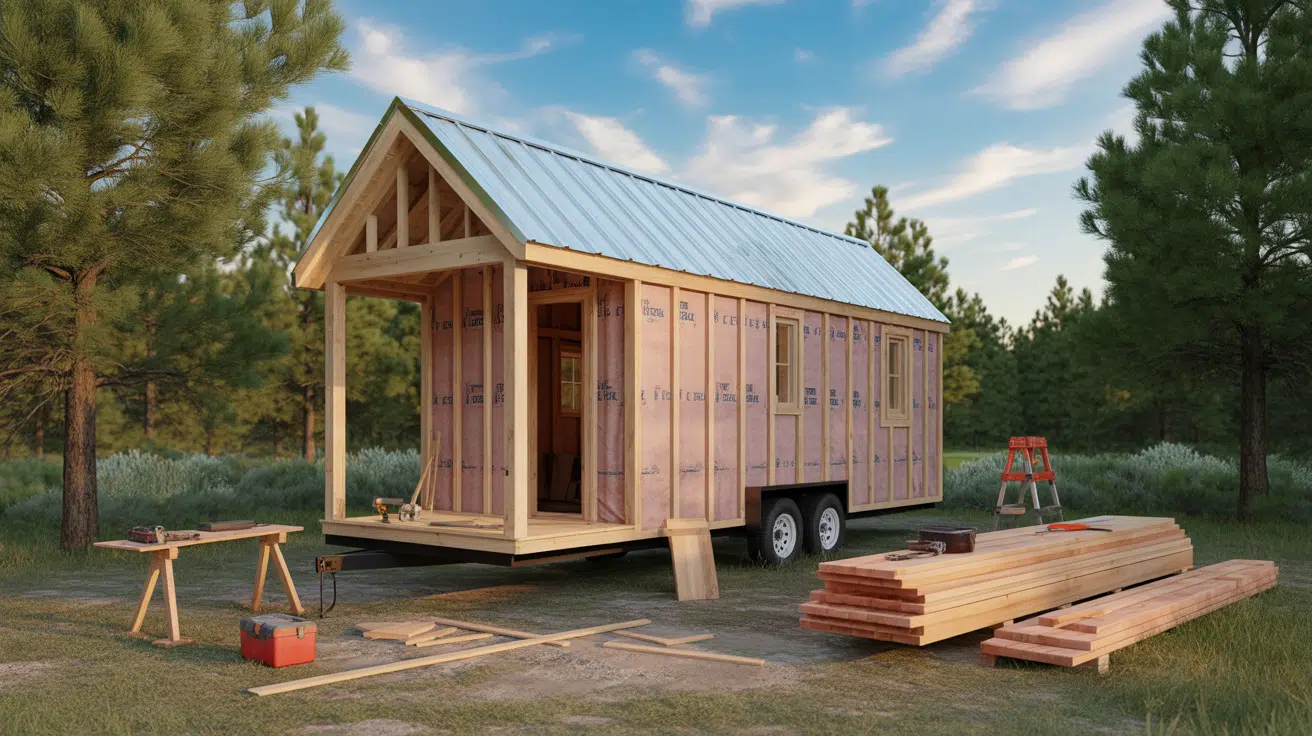
Building a Tiny Home: Step-By-Step Process
Building a tiny home takes planning, patience, and the right steps in order. Clear guidance and a step-by-step process will help guide you from the foundation to the final finishes.
Key Materials Required
1. Structural & Framing
- Flatbed trailer (8 ft wide, heavy-duty)
- 2×4 and 2×6 lumber
- Pressure-treated 2x10s
- Construction adhesive
- Wood-to-metal screws and lag bolts
- OSB boards (¾” for subfloor, ½” for sheathing)
2. Exterior & Roofing
- Vapor barrier and spray foam insulation
- House wrap and flashing tape
- Metal roofing panels and ridge cap
- Engineered siding boards
- Fascia caps and exterior paint
3. Interior Build
- R13 fiberglass insulation
- Shiplap or plywood for walls
- Tongue-and-groove ceiling boards
- LVP flooring
- Butcher block countertops and kitchen cabinets
- Tile and grout
4. Plumbing & Electrical
- Breaker panel (100-amp)
- PEX pipes and fittings
- Electrical wires (14/2, 10/2)
- Shower base and mixer valve
- Toilet, sink, and small water heater
5. HVAC & Lighting
- 12,000 BTU mini-split AC unit
- Recessed puck lights
- Exterior wall lights
6. Tools & Safety
- Drill, saws, and finish nailer
- Laser level and caulk gun
- Paint supplies
- Safety gear (gloves, mask, eye protection)
Step 1: Prepare the Foundation and Subfloor
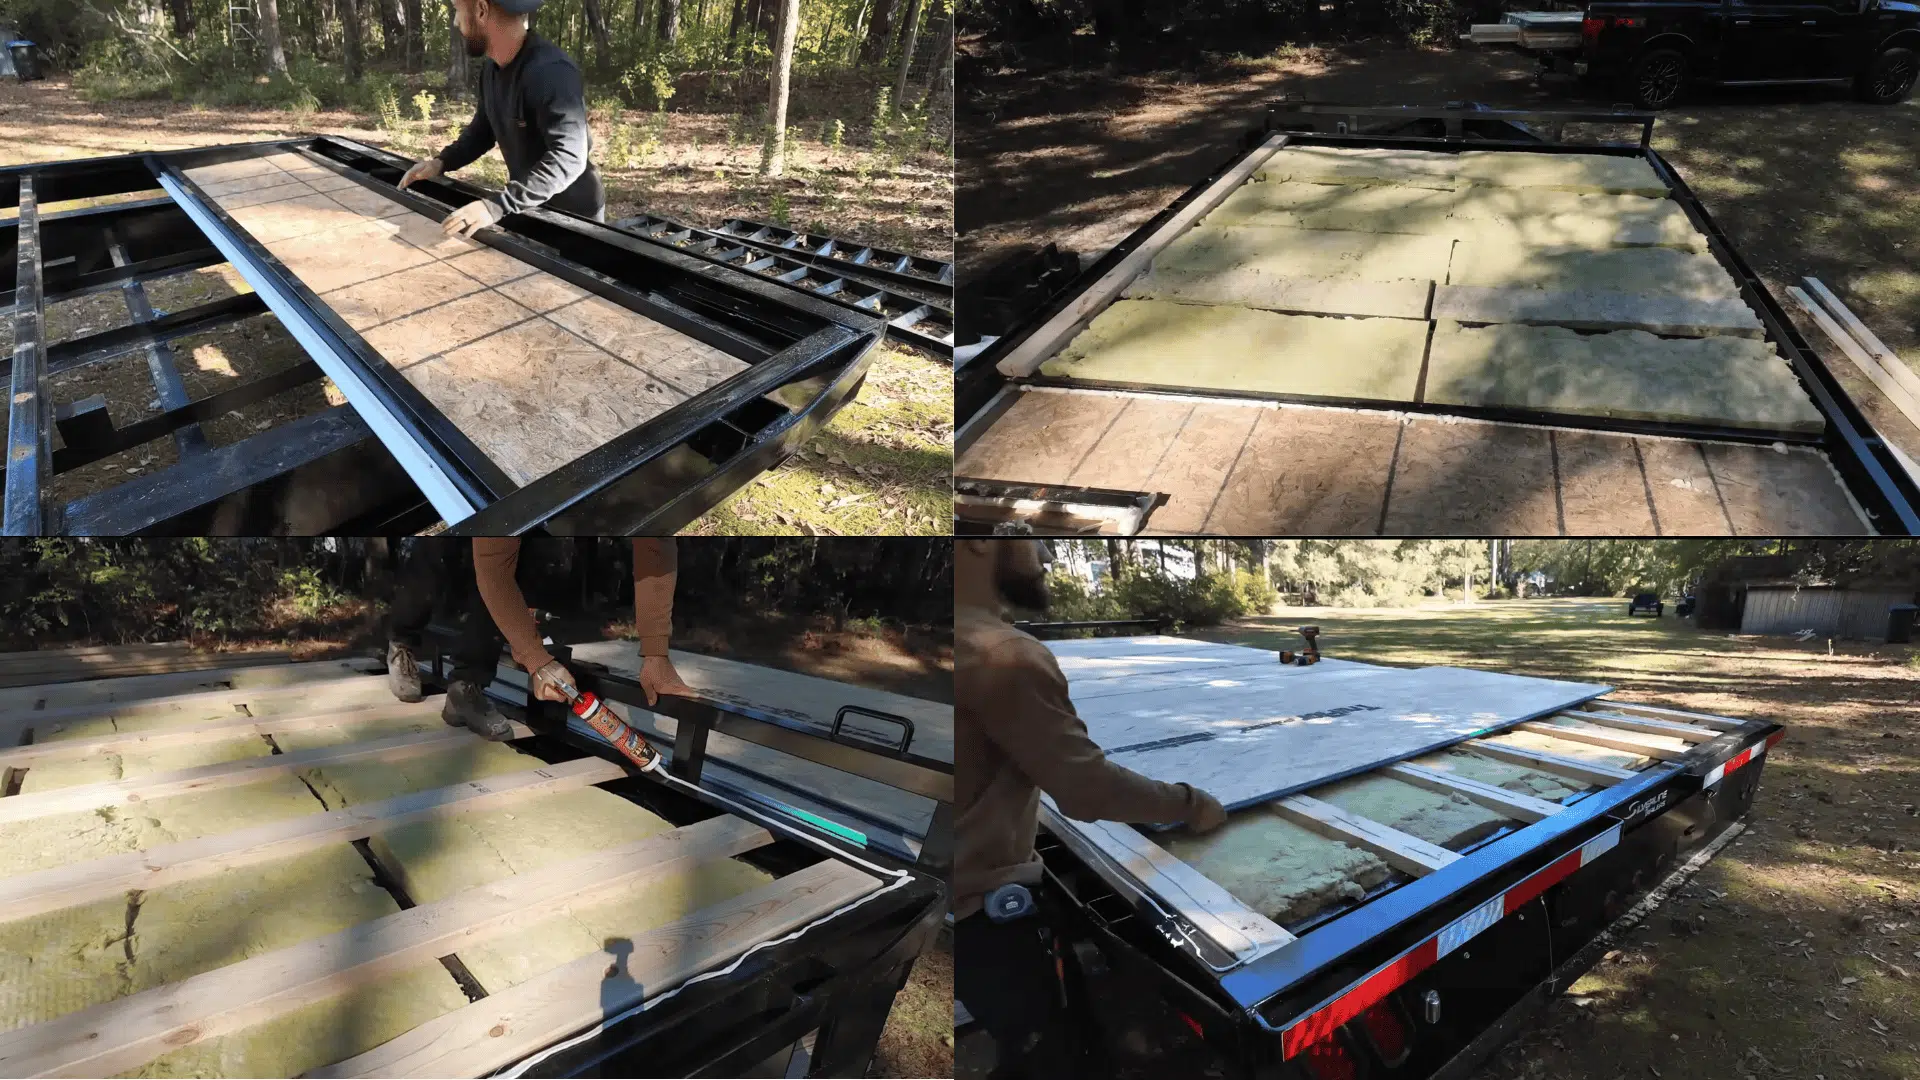
Start with a heavy-duty flatbed trailer as your base. Build a strong frame using 2×4 lumber secured with wood-to-metal screws.
Add a vapor barrier to prevent moisture and fill gaps with spray foam insulation for better protection.
Install ¾-inch tongue-and-groove OSB subfloor with adhesive and screws to lock everything in place. Finally, mark your stud locations using chalk lines to guide wall framing later.
Step 2: Frame the Walls and Loft
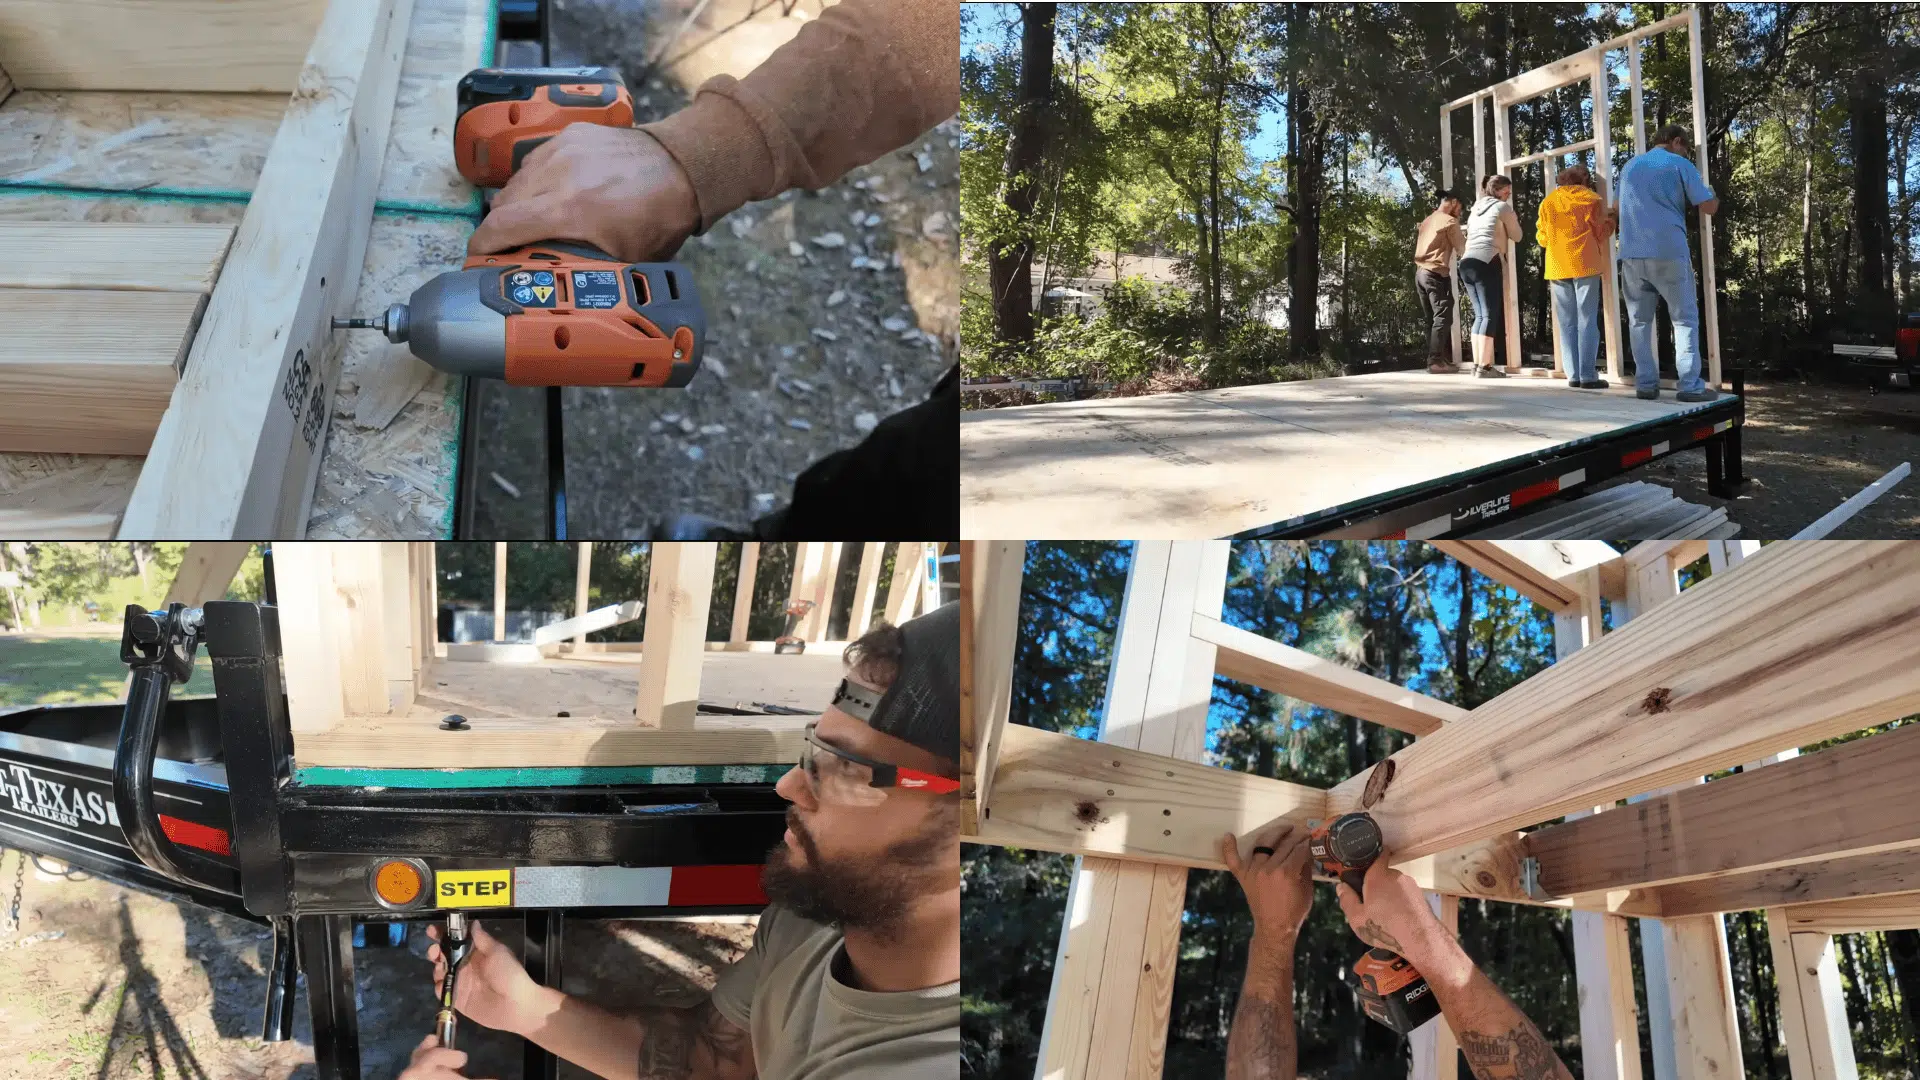
Draw detailed build plans and measure carefully before cutting your lumber. Assemble and raise the wall frames on a flat surface, then fasten them securely with Simpson screws and lag bolts.
Strengthen the structure with a double top plate for stability. Next, build your loft frame using pressure-treated lumber and install hangers to support it. Precision during this step ensures your structure is solid and square.
Step 3: Build the Roof and Sheathing

Install a sturdy ridge beam (LVL plank) and attach rafters with metal hangers. Add fascia boards and blocking to reinforce the roof edges.
Screw in 2×4 strips for attaching your metal roof panels later. Cover walls and roof with ½-inch OSB sheathing, securing each panel tightly.
Cut out window and door openings cleanly. This step provides the main skeleton and weather barrier for your tiny home.
Step 4: Waterproof and Exterior Finishing
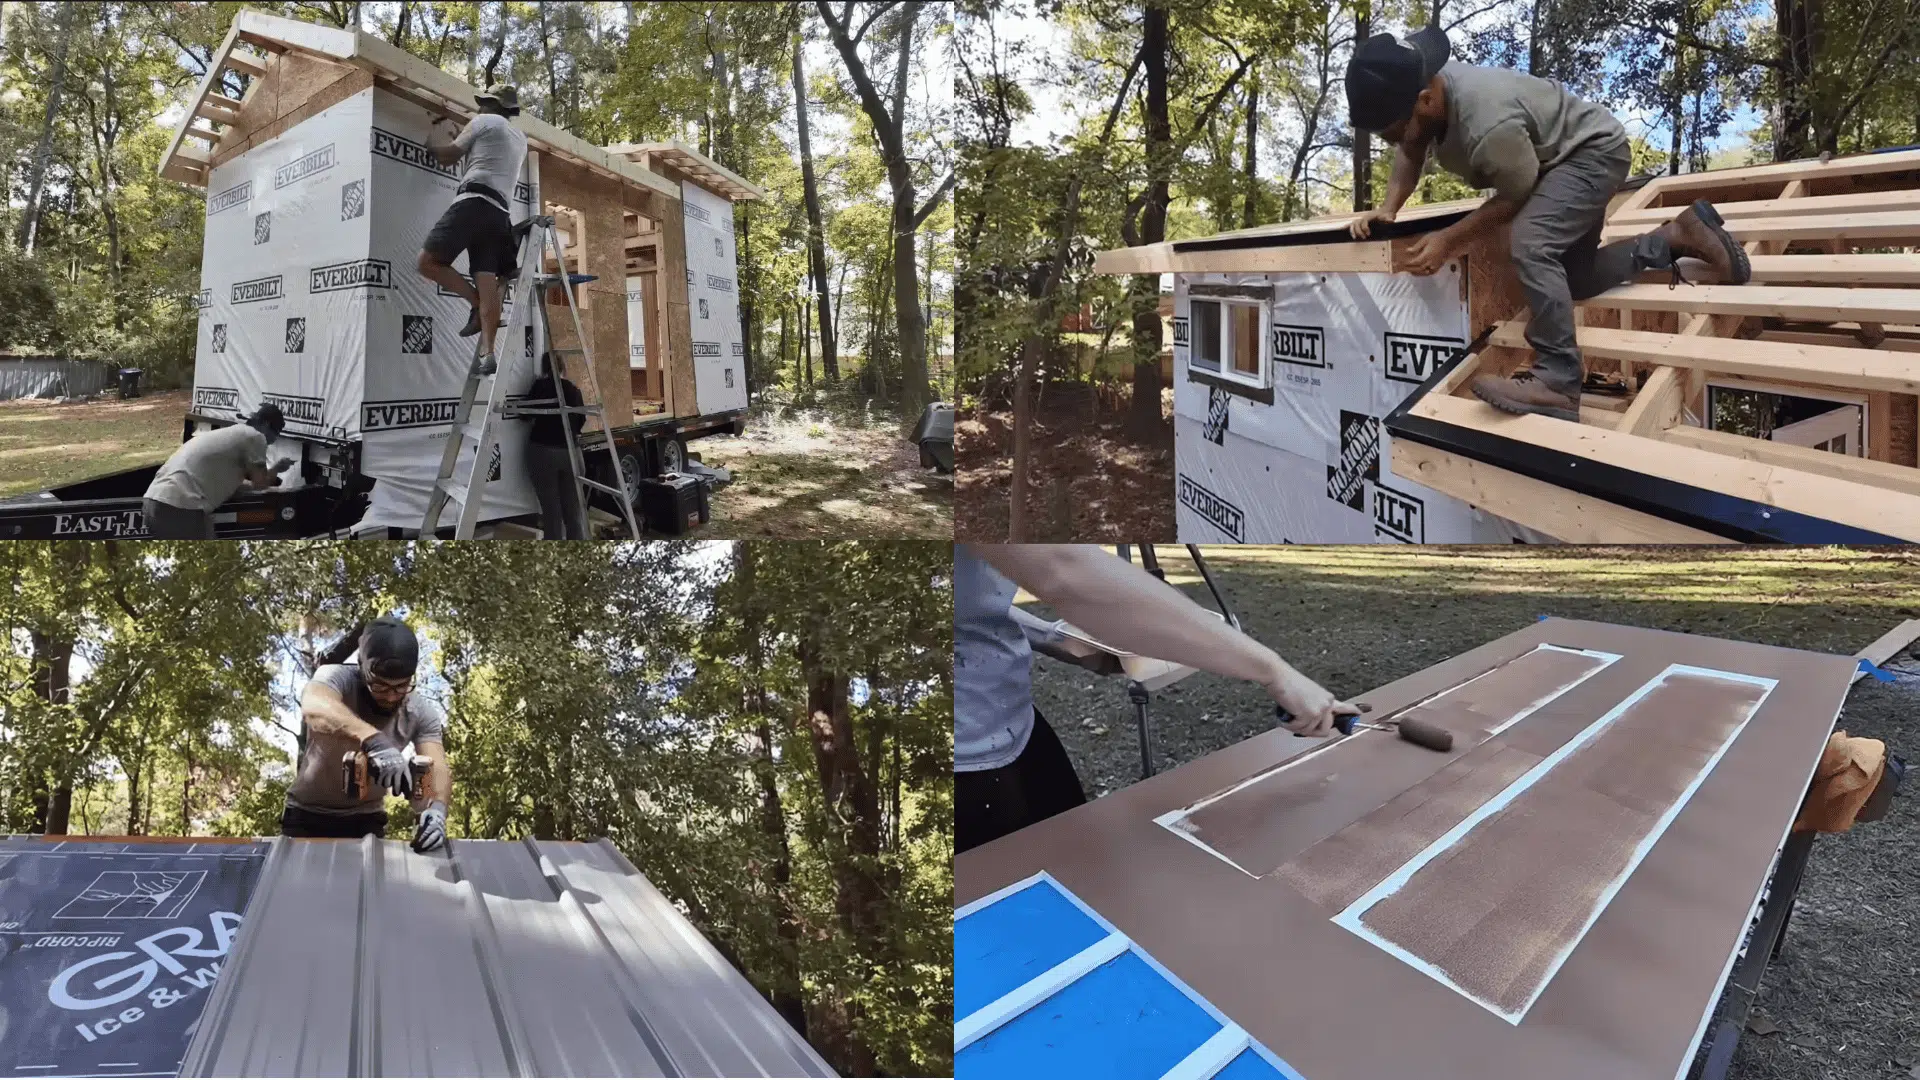
Wrap your home with house wrap to block moisture. Seal around windows and doors using flashing tape, silicone, and nails.
Install the drip edge, ice-and-water shield, and metal roof panels to protect against leaks. Secure a ridge cap on top and fill gaps with foam insulation.
Add fascia caps, engineered siding, and finish with trim and soffits. Paint the exterior to seal and protect it from the weather.
Step 5: Install Electrical and Plumbing Systems
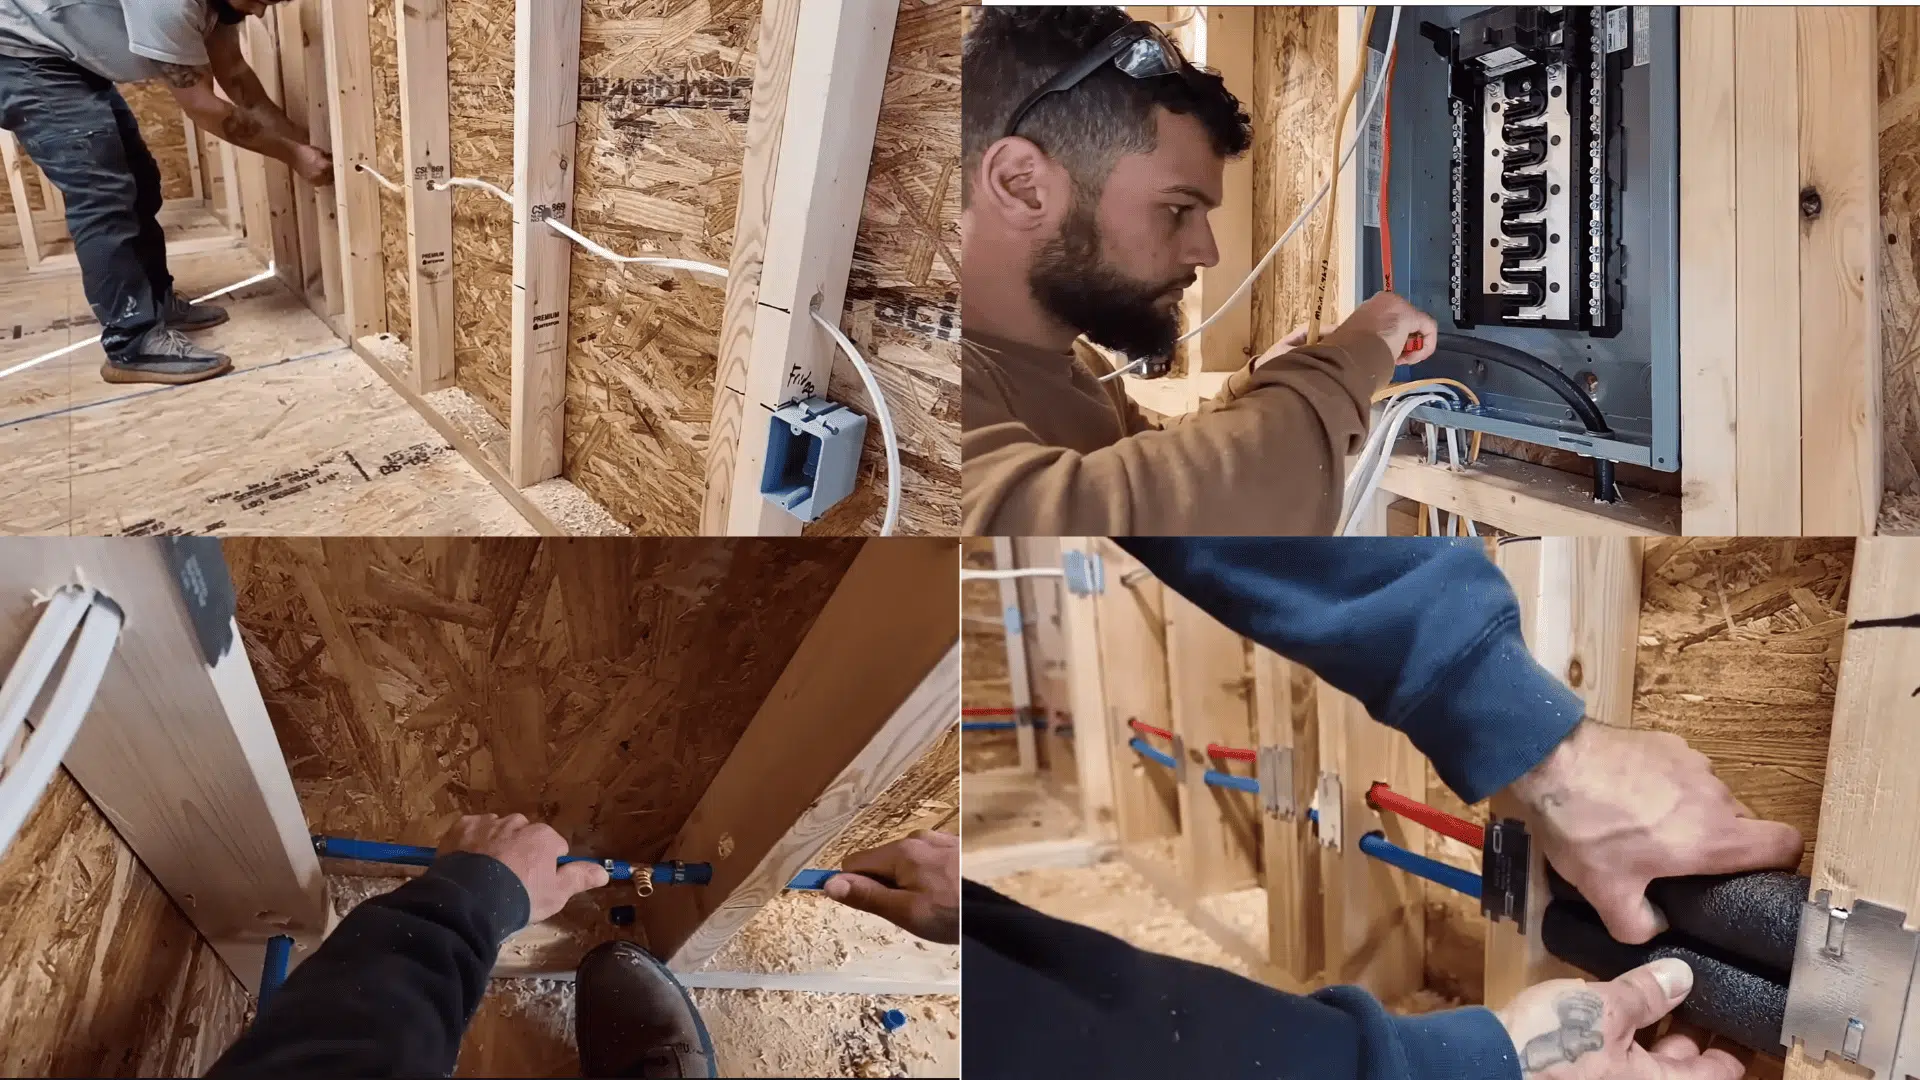
Mount your breaker panel (100-amp) and plan circuits for outlets, lights, and appliances. Run 14/2 and 10/2 electrical wires neatly through the framing, drilling holes as needed.
Use a laser level to align wiring paths. Install PEX water lines and connect them to key fixtures such as the sink, toilet, and shower.
Use metal plates and insulation sleeves to protect wires and pipes, ensuring everything meets basic safety standards.
Step 6: Insulate and Build the Interior
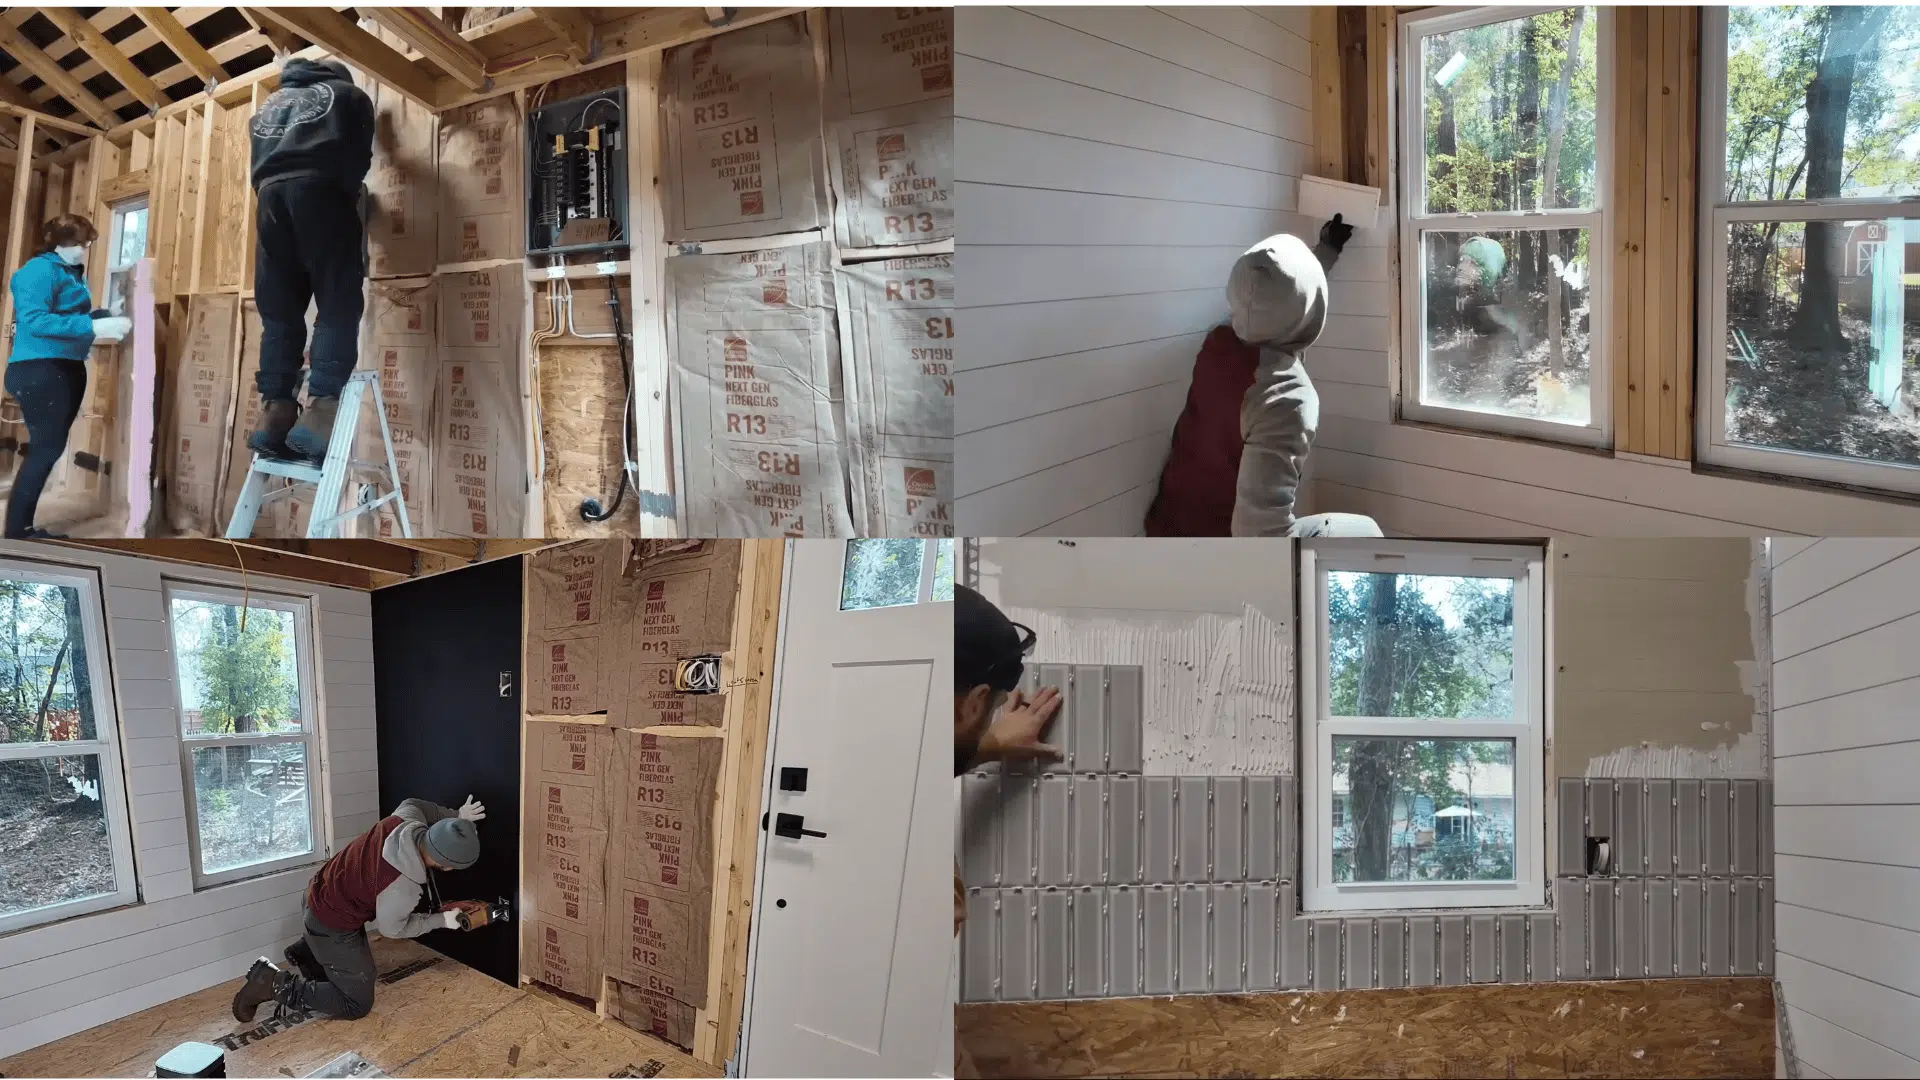
Add R13 fiberglass insulation between studs and rafters for temperature control. Cover the interior with shiplap or plywood, then create accent walls using stained pine slats for texture.
Frame interior partitions for the bathroom and loft supports. Begin painting and staining surfaces once the walls are installed.
This step provides your tiny home with warmth, comfort, and a clean, finished look while improving energy efficiency.
Step 7: Add Flooring, Fixtures, and Cabinets
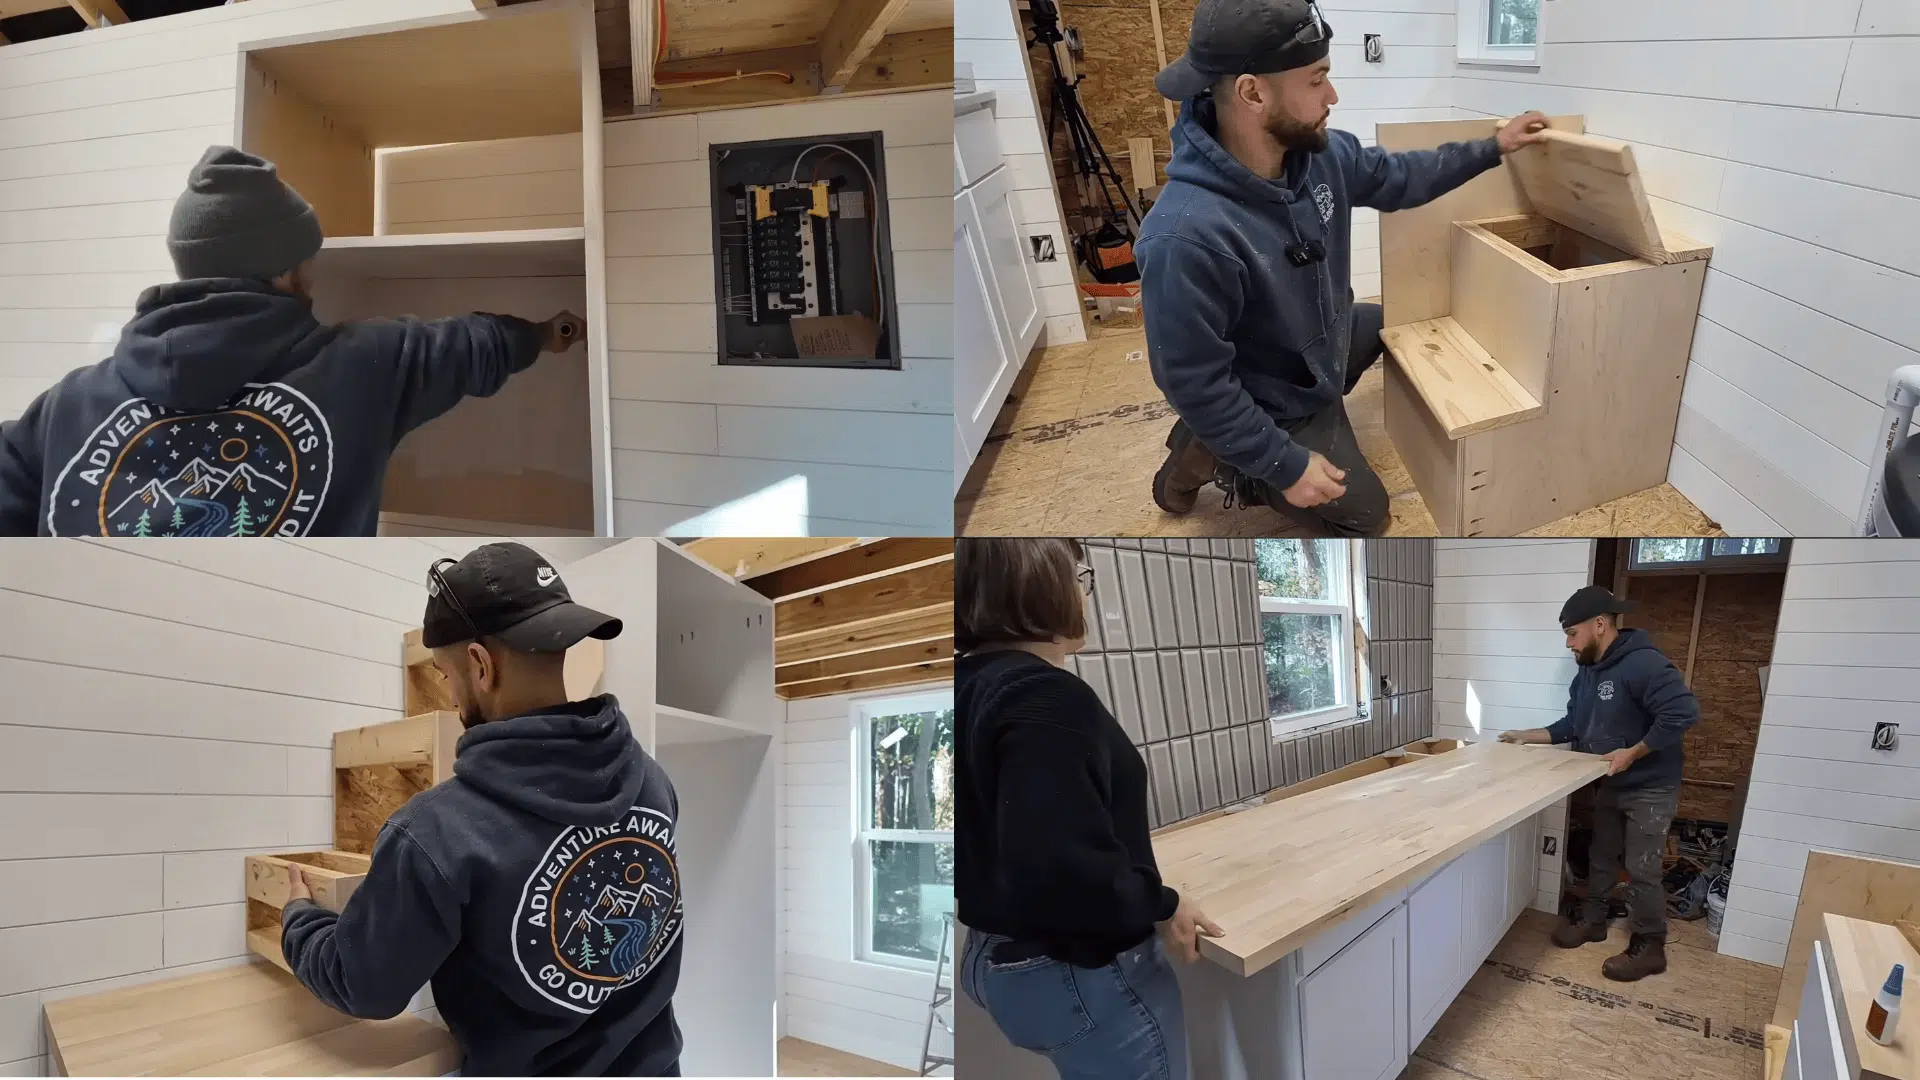
Lay down LVP flooring throughout the home and loft for durability and easy cleaning. Build and install kitchen cabinets, butcher block countertops, and a tiled backsplash for a polished finish.
Add stairs with hidden storage to save space. Complete the look with trim, baseboards, doors, and lighting fixtures.
Finally, install the water heater and connect it to your plumbing. This stage brings functionality and style together.
Step 8: Finish Bathroom, HVAC, and Final Touches

Install a custom shower base, niche, and tiles, then seal with grout. Add the sink, faucet, and toilet, ensuring all plumbing lines are properly connected.
Mount the barn door for space-saving access. Set up your mini-split AC system and wire it to the breaker panel.
Install exterior lighting, seal surfaces, and test every system. Clean up and decorate, and your tiny home is ready to live in.
That’s all for now. If you want to see every step in action, from framing the base to finishing the bathroom, check out the full step-by-step video on @buildersblueprint‘s YouTube channel, or check it out directly below:
Estimated Total Costs and Budget
Knowing your costs early helps you plan smarter and avoid surprises.
| Category | Estimated Cost (USD) | Details |
|---|---|---|
| Trailer & Foundation | Approx. $7,500 | Heavy-duty 8 ft wide flatbed trailer with frame prep and hardware |
| Framing & Structure | $2,000 – $2,500 | Lumber, OSB boards, screws, adhesive, and framing hardware |
| Roof & Exterior | $3,000 – $3,500 | Metal roofing, siding, soffits, fascia caps, paint, and sealant |
| Doors & Windows | $800 – $1,000 | Standard windows and entry door with flashing and trim |
| Insulation & Interior Walls | $1,000 – $1,200 | R13 fiberglass, shiplap, plywood, and interior finishes |
| Flooring & Cabinets | $1,200 – $1,500 | LVP flooring, butcher block countertop, cabinets, and trim |
| Electrical & Plumbing | $1,500 – $2,000 | Breaker panel, wiring, PEX pipes, fixtures, small water heater |
| Bathroom & Fixtures | $1,000 – $1,200 | Shower base, tiles, toilet, sink, and plumbing fittings |
| HVAC & Lighting | $1,000 – $1,200 | 12,000 BTU mini-split AC, recessed and exterior lights |
| Paint, Tools & Supplies | $1,000 | Stain, paint, caulk, silicone, and basic hand tools |
Total estimated cost is around $34,000–$35,000. This cost reflects a DIY build in which labor is self-managed and materials are purchased directly.
Understand Legal and Zoning Requirements
Before building, check your local zoning laws. They determine where you can place a tiny home and what type you can build, on wheels or on a foundation.
Check Local Regulations
- Visit your city or county website: Look for the “Building and Zoning” section.
- Call your local planning office: Ask if tiny homes are allowed in your area.
- Check RV and residential codes: These rules decide where you can park or live full-time.
- Ask about utilities: Some areas require permanent hookups for water and power.
Secure the Right Permits
You may need:
- A building permit for foundation-based homes.
- A transport or parking permit for mobile homes on trailers.
- Electrical and plumbing permits if you’re connecting to utilities.
Certification Options
If you plan to sell or tow your tiny home, certifications can make it easier:
- NOAH (National Organization of Alternative Housing): Ensures your build meets safety and code standards.
- RVIA (Recreational Vehicle Industry Association): Certifies tiny homes on wheels as RVs.
Understanding zoning laws and permits may not be the fun part of tiny home building, but it’s one of the most important. Do this first, and you’ll avoid headaches and surprises down the road.
Where to Buy Tiny Home Building Materials
Finding the right suppliers makes your tiny home build easier and more cost-effective. Choose trusted sources that offer quality materials and reliable delivery:
1. 84 Lumber
84 Lumber is one of the largest suppliers of building materials in the country. They offer lumber, OSB boards, siding, roofing, windows, and doors.
You can find everything from framing wood to finishing materials under one roof.
2. Metal Roofing Source
Metal Roofing Source is a go-to supplier for metal roofing panels, ridge caps, and siding materials. They ship nationwide and specialize in DIY-friendly roofing systems.
Great for sourcing quality metal roofs similar to those used in the build video.
3. L&W Supply
L&W Supply distributes a wide range of construction materials, including insulation, drywall, and interior finishing supplies.
With branches across the U.S., they’re a reliable source for R13 insulation and vapor barriers.
4. Owens Corning
Owens-Corning is a well-known U.S. manufacturer of fiberglass and foam insulation products. Their insulation is durable, energy-efficient, and widely available through local retailers.
Perfect for maintaining comfort in small spaces, such as tiny homes.
These suppliers cover everything from lumber and roofing to insulation and finishes. Compare prices, check local availability, and buy in bulk where possible to save money.
DIY vs. Hiring a Professional
Building a tiny home comes with a big decision: do you build it yourself or hire professionals? Each option has its pros, costs, and timelines, so it’s best to know what fits your skills and budget:
| Aspect | DIY Build | Hiring Professionals / Subcontracting |
|---|---|---|
| Best For | People with basic building, electrical, or plumbing skills who enjoy hands-on work | Those who want expert help for complex or risky tasks like wiring, roofing, or plumbing |
| Main Advantage | Saves money on labor and offers full creative control | Ensures safety, quality, and faster completion |
| Main Challenge | Requires more time, research, and effort | Higher upfront cost |
| Recommended For | Builders with patience and a willingness to learn | Beginners who want guidance or limited time to build |
| Typical Cost Range | $20,000 – $35,000 | $50,000 – $80,000 |
| Average Timeline | 3 – 6 months (part-time work) | 6 – 10 weeks (full build) |
| When to Choose | If you want to learn and manage your project fully | If you want code compliance, inspections, and certified results |
Tip: Many people choose a hybrid approach, doing the basic construction themselves while hiring professionals for specialized work. This keeps the project safe, affordable, and on schedule.
Troubleshooting & Common Mistakes to Avoid
DIY tiny home builds come with a few common challenges. Here are key problems to watch for and simple ways to handle them:
- Budget overruns: Track all expenses, compare prices, and add a 10–15% buffer for unexpected costs.
- Moisture leaks: Seal windows, doors, and roofs with flashing tape, silicone, and overlapping house wrap.
- Weak framing: Check measurements, use Simpson screws and lag bolts, and ensure all frames are level.
- Poor insulation: Fill every cavity with R13 fiberglass or spray foam, and seal edges tightly.
- Ventilation issues: Add soffit vents, vent screens, or exhaust fans to improve airflow.
- Skipping permits: Follow local building codes, get permits, and consider NOAH or RVIA certification.
- Electrical mistakes: Have a licensed electrician handle wiring, breaker panels, and outlet tests.
- Plumbing leaks: Use PEX clamps and fittings, test pressure, and protect exposed pipes.
- Overloading trailer: Balance weight evenly, use light materials, and stay within load limits.
- Rushed finishes: Apply paint, caulk, and sealants carefully for durability and a clean look.
Tiny home building is all about patience and precision. Paying attention to small details now saves you from costly repairs later.
Conclusion
Building your own tiny home is an exciting journey that gives you control, creativity, and freedom.
With the right plan, tools, and materials, you can create a cozy space that fits your lifestyle and budget.
Take your time, follow each step, and don’t rush the process – every detail matters. Whether you’re building for travel, simplicity, or savings, the result will be a home that truly feels yours.
Ready to build your own tiny home? Gather your materials, plan your layout, and take the first step toward creating a space that fits your life.


21 Responses
I have keen interest in this type of project
Waw can I buy a new tiney builder house and pic between 10 or 12 dezines or more
Loved the video, started watching at 3 am as I just had total knee replacement and couldn’t sleep. As I have gotten older I dream of a tiny house, like the one built in video to retire and enjoy life, a simple life with mountain views.
Has a picture of a tiny house on foundation but article does not discuss anything other than tiny house on wheels.
I’m looking to see total cost for 600 square ft tiny home
I LOVE this article. I’ve been dreaming of a tiny home for a very long time. This article lays out everything in a logical and easy-to-follow process. Thanks for getting me one step closer to achieving my dream.
Would love to build a tiny home but don’t have land.
I’ve never seen anybody do have a list like you did and be so thorough with everything that needs to be bought etc!
How did I find local experienced tiny home professionals to help me understand the regulations and connect it to my home’s utilities as required? Thx.
I would like to know if we can do this in ontario
Looks great
Interested in ADU
Great Article!
Send me a printed copy of, How to build a tiny home: Your complete DIY guide?
[email protected]
Thx
D
Me and client homeless just need 2 bdrm 2 bth 1057 sqft we been staying at salvation army and it’s not clean always fighting and deaths from the train tracks …and so many crack heads she don’t make twice the rent but she get a check every month by the 5th or sooner….help us $750-8:25, $900
We just need a chance, yes it can be fully furnished and a kitchen nets so we can cook it’s such it feels ok….
Yay
Interested in a . Mobile tiny home
Native American Accents
Earth tones natural lighting a must for 2 and 1 small dog.
Thank you for such detailed information. I have been binge watching tiny home builders for the several months, and I know exactly what I want and that it’s possible in a tiny home. I am currently searching for a small lot in a developed to build a tiny home on a real foundation. My needs/lifestyle will require the largest tiny home with the master on lower level. I have a couple of must-haves.
Would you have any recommendations/suggestions for a tiny home builder in Onslow, or Carteret counties in NC?
Thanks for your time!
It’s my dream to own one on wheels, to visit family and NOT infringe on them!
You guys did an excellent job. I am not handy and I am handicap as well. If I were to Sub out the jobs, approximately what would I be looking at complete price wise for this same house? I have a house and looking to downsize and love these tiny houses, so I am in the looking stage right now and live in Mass.
I have Not seen another site so willing to help with full information on how to build a tiny home. When you read this you get a better picture of what it’s like to diy a tiny home build. I have a son in law that builds all kinds of things for inside their home. You would never guess they were home built. Everything turns out beautifully.
I know they have little free time but I have no doubt he could build a tiny home. Im gonna pass this on to him. It might take a while, due to little free time, but he might want to see what he can do. Who knows he might enjoy building these so much he might build a tiny home village.
Thank you so much for your post.