
Looking for a simple, eco-friendly way to save water at home? A grey water system might be the perfect project.
This guide walks you through everything – from how it works and the benefits, to building your own DIY setup.
You’ll also learn about different system types, costs, safety rules, and easy maintenance tips.
No matter if you’re a beginner or a homeowner ready to upgrade your water efficiency, this will help you design a system that fits your home, budget, and lifestyle.
What is a Grey Water System and How Does It Work?
A grey water system captures used water from sinks, showers, and laundry and gives it a second life. Instead of sending it down the drain, it redirects that water for irrigation, cleaning, or other outdoor uses.
The system filters out dirt, soap, and residue before reuse, keeping it safe for soil and plants. Gravity often moves the water through pipes, but pumps can help when the ground is flat.
Once installed, it runs quietly and automatically, reducing water waste without changing your daily routine.
Benefits of Grey Water Systems
- Saves Water: Reuses lightly used water, cutting your home’s clean water consumption.
- Reduces Drainage Load: Less water flows into municipal systems, easing local water management.
- Protects Septic Systems: Lowers strain on septic tanks and helps groundwater stay cleaner.
- Improves Soil Health: Provides plants with nutrient-rich water that boosts natural growth.
- Cuts Fertilizer Use: Reduces reliance on chemical fertilizers over time.
- Supports Sustainability: A long-term step toward eco-friendly and efficient home living.
Grey water systems don’t just save water – they help build a more sustainable home and community for the future.
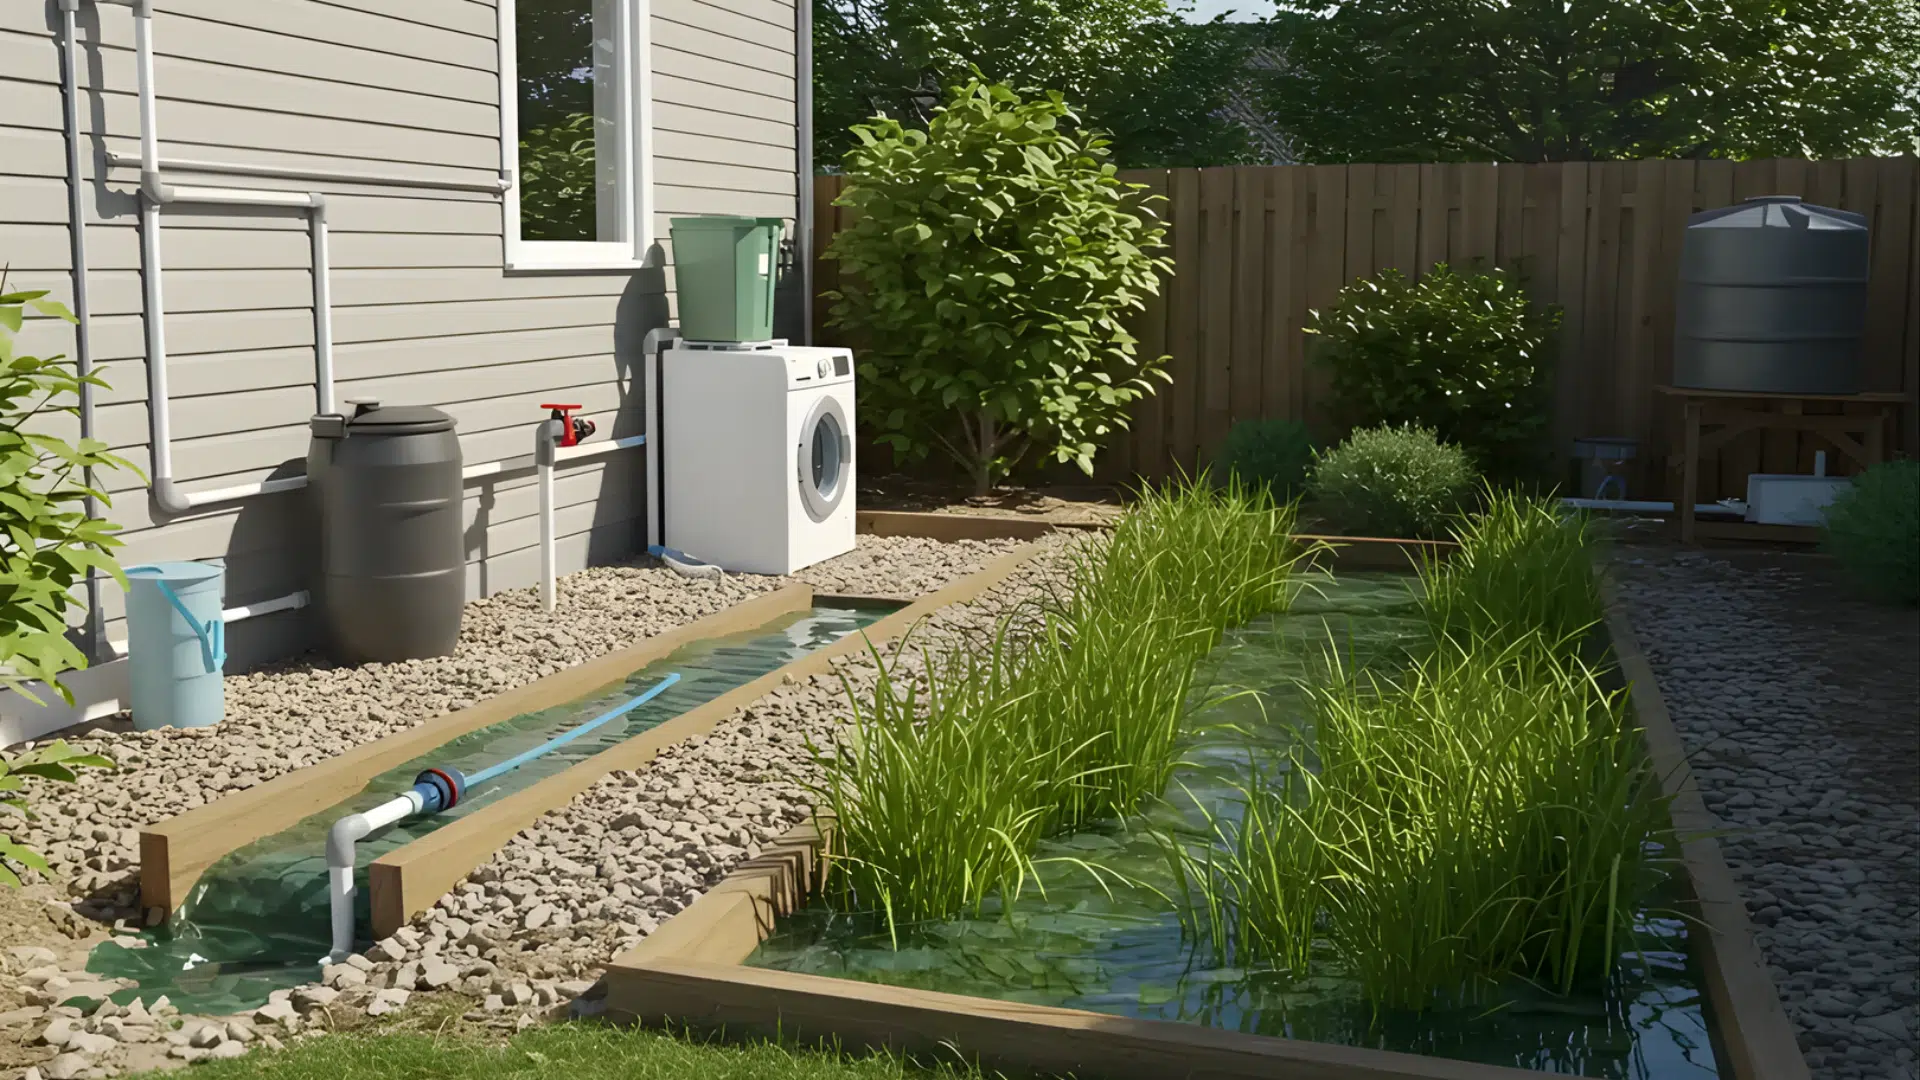
How to Build a DIY Grey Water System
Building your own system is easy when you plan ahead and follow these clear steps. With simple tools and a few hours of work, you can start saving water right at home.
Materials and Tools
Before starting, make sure all parts are ready and fit together correctly. Gather:
- PVC Pipes and Connectors: Carry grey water smoothly from the source to the outlet.
- Diverter Valve: Redirects water away from the drain and into your system safely.
- Filter (Mesh or Sand): Removes soap, lint, and small debris to keep water clean.
- Storage Tank or Drum: Holds filtered water before sending it out for reuse.
- Basic Tools: Drill, gloves, wrench, and waterproof tape for sealing and protection.
Preparation prevents leaks, saves time, and helps your setup run smoothly from day one.
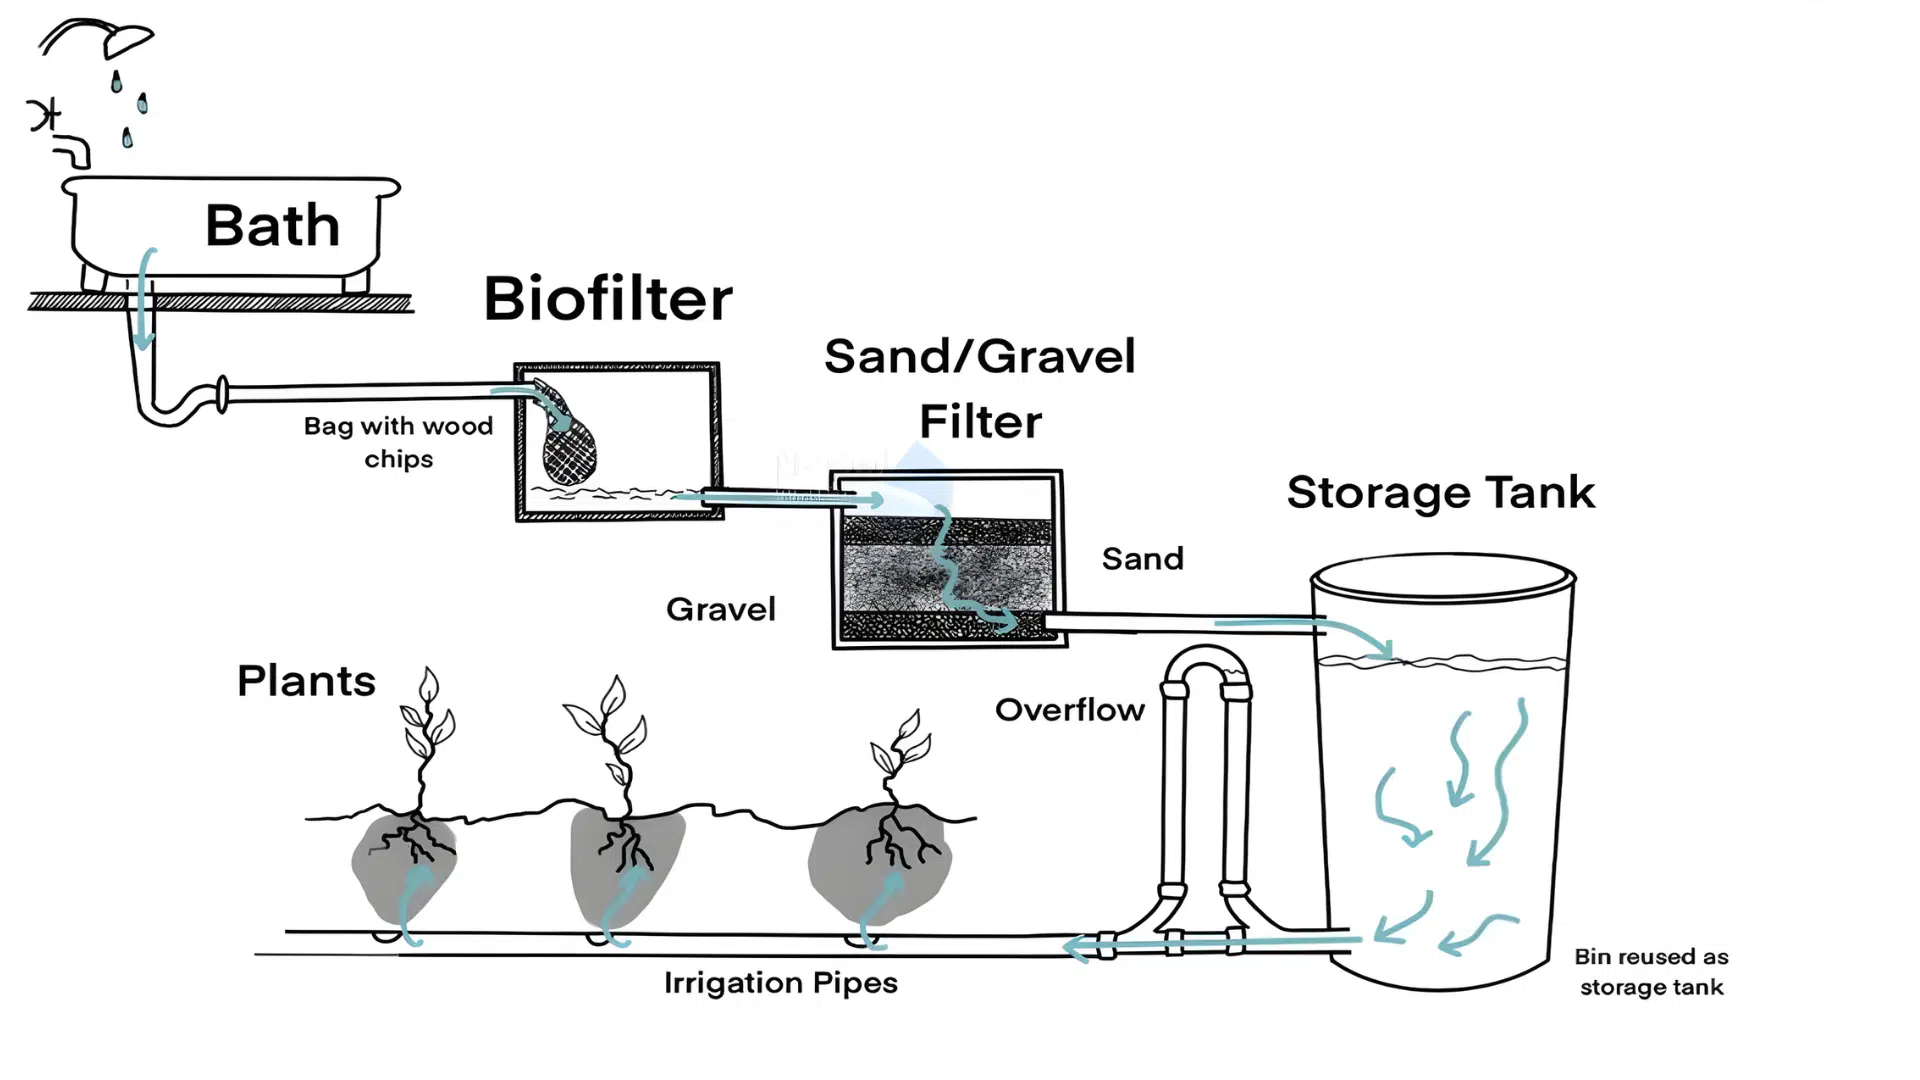
Step 1: Find a Water Source
Choose where your grey water will come from – usually a shower, bathroom sink, or washing machine. These sources produce lightly used water that’s safe for reuse.
Avoid kitchen drains or toilets, as that water contains food waste and bacteria.
Step 2: Install the Diverter Valve
Attach a diverter valve to the selected drain line. This device redirects water from your main plumbing system into your grey water setup.
Make sure it’s easy to switch off when you need maintenance or cleaning. Check the connection regularly to ensure no leaks or blockages develop over time.
Step 3: Connect Pipes
Use PVC pipes to carry water from the diverter valve to your filter or storage tank. Keep the path as straight as possible for smooth, consistent flow.
Use watertight fittings to prevent leaks or clogs and secure the joints tightly. It’s best to insulate or cover the pipes if they run outdoors to protect them from heat or freezing.
Step 4: Add the Filter
Set up a filter filled with mesh, gravel, or sand to trap soap, lint, and small particles before reuse. This step keeps the water safe for the soil and prevents clogging in irrigation lines. To ensure you’re using the most reliable equipment for your home, exploring the best Water Filters in Australia can provide you with advanced solutions that maintain high water quality for indoor use.
Clean or replace the filter regularly for best performance. If you notice slow flow, rinse or replace the top filter layer to restore pressure.
Step 5: Set the Outlet Path
Guide the filtered water to its destination – usually a garden bed, gravel trench, or drip irrigation system. Make sure the outlet is slightly lower than the tank for steady gravity flow.
Avoid using grey water on edible plants that touch the soil directly. Always spread the water evenly to prevent pooling and maintain healthy, balanced soil moisture.
Step 6: Test the Flow
Run water through the entire system and look for any leaks or pressure drops. Tighten connections and adjust flow if needed. Once it runs smoothly, your grey water system is ready to use and maintain.
Once water flows smoothly, label your system clearly for easy upkeep. You now have a working setup that safely reuses water every day.
Types of Grey Water Systems
Grey water systems come in different types to fit various homes, budgets, and water-saving goals.
Bucket systems are the simplest, using containers to collect shower or sink water for plants – perfect for beginners and low-cost setups.
Gravity systems rely on your home’s natural slope to move water through pipes without power, making them quiet and easy to maintain.
Pumped systems use a small motor to move water across flat areas or long distances, ideal for large gardens.
Filtered systems clean water through sand or charcoal before reuse, giving you clearer water for lawns or outdoor cleaning.
Each option offers a smart, eco-friendly way to make the most of every drop.
Cost and Product Options
Here’s a quick look at the available water system options, along with their average prices and main features.
| System Type | Average Cost | Best For | Key Features | Examples |
|---|---|---|---|---|
| DIY System | $100–$300 (materials) | Small homes, beginners | Low cost, customizable, simple setup | Self-built |
| Pre-Built Kit | $600–$1,300 | Quick installation | Ready parts, easy assembly, low maintenance | Aqua2use $629.99; Biolan $1,249.99 |
| Pumped/Advanced | $1,000–$2,000+ | Large homes, flat terrain | Pump included, stronger filtration, higher output | Vetus GWDS $1,217–$1,379 |
Choose what fits your budget, space, and timeline, then scale as needed.
Legal and Safety Guidelines
Before setting up a grey water system, it’s important to follow a few safety and legal steps. This ensures your setup works efficiently and stays compliant with local health standards.
- Check Local Regulations: Some cities require permits or restrict where grey water can be used. Always confirm before installation.
- Use Subsurface Discharge: Release grey water below ground level to prevent pooling or human contact.
- Avoid Food Crops: Keep outlet lines away from vegetables, herbs, or fruit-bearing plants.
- Stick to Lawns and Trees: Safely reuse water for lawns, shrubs, or ornamental gardens instead.
Following these steps keeps your grey water system legal, hygienic, and eco-friendly – a smart move for both your home and the environment.
Maintenance and Troubleshooting
Keep your grey water system running smoothly with these key practices:
- Separate Lines Properly: Only collect water from sinks, showers, and laundry; never connect kitchen or toilet drains.
- Use Eco-Friendly Products: Stick to biodegradable soaps to protect plants and prevent filter damage.
- Clean and Inspect Regularly: Check filters, pipes, and joints every week to prevent leaks or buildup.
- Flush the System Occasionally: Run clean water through the pipes to clear residue and stop bad odors.
- Respond Quickly to Issues: If you notice slow flow or a bad smell, drain, rinse, and reset the system immediately.
These simple actions prevent clogs, protect your garden, and keep the system efficient for years.
Conclusion
Building a grey water system is a simple way to recycle everyday water and make your home eco-friendly. It reduces waste, saves money, and helps the environment without much effort.
With a few tools and regular care, your system will run smoothly for years. You now know how to plan, build, and maintain it safely while keeping your garden healthy.
Start small, try reusing laundry or shower water first, and see the results. Once you do, expand your setup and take a meaningful step toward a cleaner, more sustainable lifestyle.


One Response
This is a wonderfull piece of information. Thank you very much.